

Arduino UNO: Complete Beginner's Guide to Microcontroller


Arduino UNO: Complete Beginner's Guide to Microcontroller
The Arduino UNO R3 is the world's most popular open-source microcontroller board, built on the ATmega328P chip. Whether you're a student, hobbyist, or professional engineer, it is the single best starting point for learning physical computing, embedded systems, and IoT prototyping. Available now at Indus Technologies, Bangalore's trusted electronic components distributor.
Microcontrollers have transformed how engineers, students, and hobbyists build interactive electronic projects. At the heart of this revolution sits the Arduino UNO R3 — a compact, affordable, and endlessly versatile development board that has introduced millions worldwide to the world of embedded programming. From blinking LEDs to controlling industrial robots, the Arduino UNO is the gateway board that never stops giving.
India's booming electronics market — driven by initiatives like Make in India, PLI schemes, and a rising tide of engineering education — has made the Arduino UNO more relevant than ever. If you are searching for the best Arduino boards in India, visit Indus Technologies.
What is the Arduino UNO?
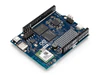
The Arduino UNO is an open-source microcontroller development board based on the ATmega328P microcontroller chip manufactured by Microchip Technology. "UNO" means "one" in Italian, signifying it as the first in a series of USB-powered Arduino boards. It was designed and is manufactured by Arduino — an open-source hardware and software company — and is the most widely used entry-level board for electronics prototyping across the globe.
The board is programmed using the Arduino IDE (Integrated Development Environment), which uses a simplified version of C/C++. It communicates with your computer over a standard USB connection, and can be powered either via USB or with an external 7–12V power supply.
Arduino UNO R3 — Technical Specifications
Understanding the hardware specifications helps you judge which projects the board can handle and how to interface components correctly.
| Parameter | Value |
|---|---|
| Microcontroller | ATmega328P |
| Operating Voltage | 5V |
| Input Voltage (recommended) | 7–12V |
| Clock Speed | 16 MHz |
| Flash Memory | 32 KB (0.5 KB used by bootloader) |
| SRAM | 2 KB |
| EEPROM | 1 KB |
| Digital I/O Pins | 14 (of which 6 provide PWM output) |
| Analog Input Pins | 6 (10-bit ADC) |
| DC Current per I/O Pin | 20 mA |
| USB Interface | USB Type-B |
Arduino UNO Pin Layout and Key Functions
Mastering the pin layout is essential before starting any Arduino project. Each pin serves a distinct function — here is a concise breakdown:
Digital Pins (D0–D13): These are general-purpose input/output (GPIO) pins that can read or write either a HIGH (5V) or LOW (0V) signal. Six of these pins — D3, D5, D6, D9, D10, and D11 — support PWM (Pulse Width Modulation), which allows analogue-like output for controlling motor speeds and LED brightness.
Analog Pins (A0–A5): These pins read analogue signals — such as from a potentiometer, temperature sensor, or light-dependent resistor — and convert them to a 10-bit digital value (0–1023) using the built-in ADC.
Power Pins: The board provides regulated 5V and 3.3V outputs to power external components, plus multiple GND (ground) pins. The Vin pin allows you to power the board from an external battery or adapter (7–12V).
Communication Pins: D0 (RX) and D1 (TX) handle UART serial communication. Pins D10–D13 support SPI (Serial Peripheral Interface) for connecting SD card modules and displays. Pins A4 (SDA) and A5 (SCL) support I²C communication for interfacing with sensors and displays using just two wires.
Key Electronic Components Used with Arduino UNO
Resistors
Resistors are among the most fundamental passive components used alongside the Arduino UNO. They limit current flow to protect LEDs, sensors, and the microcontroller's I/O pins — which can supply a maximum of only 20 mA per pin. Without a current-limiting resistor, even a simple LED can permanently damage the ATmega328P. Available as fixed or variable (potentiometer) types, resistors like the 67WR2KLF potentiometer are commonly used in Arduino-based control panels and volume/brightness adjustment circuits.
Diodes and Rectifiers
Diodes serve as one-way valves for current, playing a critical protective role in Arduino projects. Flyback diodes (such as the 1N4007) are placed across relay and motor coils to protect the board from voltage spikes when inductive loads are switched off. In Arduino-based power supply designs, rectifier diodes convert AC input to the DC supply the board needs to operate reliably.
Optocouplers / Isolators
When your Arduino needs to interface with high-voltage systems — such as industrial machinery, mains-powered relays, or AC motor controllers — optical isolators like the HCPL-2631 provide critical electrical isolation. They transfer the digital control signal from the Arduino across a light barrier, ensuring that voltage spikes or faults on the high-voltage side can never reach and destroy your microcontroller.
Popular Arduino UNO Projects for Beginners
The Arduino UNO is the ideal board for hands-on learning. Here are six projects perfect for getting started:
- LED Blink & PWM Dimming — Learn GPIO control and PWM by fading an LED using analogWrite().
- Temperature & Humidity Monitor — Interface a DHT22 sensor and display readings on a 16x2 LCD.
- Line-Following Robot — Use IR sensors and an L298N motor driver to build a self-navigating robot.
- RFID Access Control System — Wire an RC522 RFID reader to grant or deny access via card scan.
- Ultrasonic Distance Meter — Use an HC-SR04 sensor to measure distance and display it on Serial Monitor.
- Smart Plant Watering System — Read soil moisture with a capacitive sensor and trigger a relay to water automatically.
Your First Arduino Sketch — Blink
The "Blink" sketch is the "Hello World" of the Arduino world. It flashes the onboard LED on pin 13. Install the Arduino IDE, connect your UNO via USB, paste the code below, and click Upload:
// Blink — turns built-in LED on and off every second

void setup() {
  pinMode(13, OUTPUT);  // set pin 13 as output
}

void loop() {
  digitalWrite(13, HIGH); // turn LED ON
  delay(1000);             // wait 1 second
  digitalWrite(13, LOW);  // turn LED OFF
  delay(1000);             // wait 1 second
}
Conclusion
The Arduino UNO R3 remains, after more than a decade, the most recommended first microcontroller board for a reason — it is robust, well-documented, endlessly hackable, and supported by one of the richest communities in open-source hardware. Whether you are building a classroom prototype, a smart home automation system, or a full industrial IoT sensor node, the UNO gives you the foundation you need.
Indus Technologies, the complete electronic parts supplier in Bangalore, stocks genuine Arduino UNO R3 boards along with all the resistors, diodes, isolators, sensors, and shields you need to bring your project to life. From the 67WR2KLF potentiometer for analogue control to the 1N4007 flyback diode for motor protection and the HCPL-2631 optocoupler for safe high-voltage interfacing — everything is available under one roof.
As the world of electronic components continues to evolve, the Arduino UNO stands as the perfect bridge between imagination and invention. Start building today.
Post Photo Gallery

-

-

November 27, 2025
Connecting the Dots: How Electronic Components Work Together in Devices -

November 27, 2025
How reliable is your electronics components supplier